Prius C backseat removal in 10 steps
(History)
Prius C backseat removal in 10 steps
I drive a 2016 Prius C II. I recently swapped out all my seats and dash in exchange for my sister's tires/rims I wanted since I had hubcaps. I couldn't find a tutorial or directions on the folding rear seat, back (not bottom) removal so I thought I'd share the knowledge here. All the other mods I've done were possible with other tutorials from this site, so thanks everyone! I've also added some underglow lights connected to the battery for $25, some footwell lights, changed the dome lights to blue LEDs, baked the headlights in the oven and "plastidipped" (rubberized spray paint) the chrome on the inside, and installed a 3000 watt max subwoofer to upgrade the audio system. It takes up nearly the entire hatch space, renders my rearview useless, and shakes the ground with a demanding force! Haha I made the sticker on the windshield, and lastly plan to tint the windows and maybe add some window visors. Let me know if anyone wants a write up on any of these other installs. If you have comments/questions I/d love to hear them!
Here's how to completely remove the back seat of a 2014-2016 Prius C. The front seats are pretty simple, 4 bolts total on each end of the track. Pop off the plastic covers on 3 of the ends to reveal the bolts.
PART 1: Bottom seat removal
Step 1: Remove the bottom trim. This will allow you to remove the plastic "kickplate" in step 2 and the plastic hatch liner in step 8. Get your finger tips underneath it and pull up, it'll snap out easily.
Step 2: Remove the plastic "kickplate" at the base of the back seat seat that protects the batteries by pushing the center of approximately 7 pop tabs and pulling them out. Once the plastic is removed, you will see everything under the seat. (I don't remember how many there are exactly but they are all at the top.) I don't have a picture for this, but it's the piece that your heels would hit if you were sitting in the seat.
Step 3: Remove the bottom seat. Firmly grab the side of the bottom seat and pull upwards. There are 2 snap connections that hold the seat in place in the center of each "seat" where 2 people would sit. It doesn't take a ton of pressure to release the seat from the battery cage. You won't break them, go ahead and really pull.

PART 2: Folding back seat / back rest removal. Fair warning, this part is not fun. The seats that fold down are attached by 3 bolts to the chassis of the car. You will need to remove the entire bar that allows the seats to fold down.
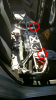
Step 4: Take out everything in the hatch except the spare tire. That would be the floor mat and the 2 foam inserts. Once you do this, one of the 3 bolts connecting the bar to the chassis will be exposed in the middle. The other 2 are located on either side under the plastic liner.
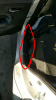
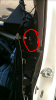
Step 5: Open the hatch and remove the center plastic trim the covers the latch to the hatch. It is held in by 2 plastic tabs that just pull out. They're in there pretty good, so I used 2 flathead screwdrivers as leverage to get them out.
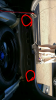
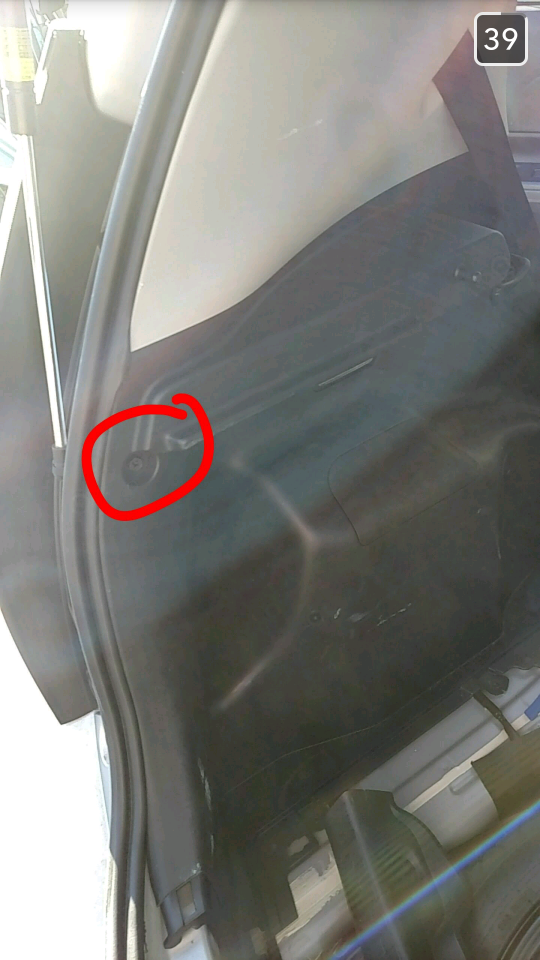
Step 6: Remove the 2 silver screws holding the plastic liner in to the chassis on the bottom and 1 black screw about halfway up nearest the weather stripping. Do this to both sides.

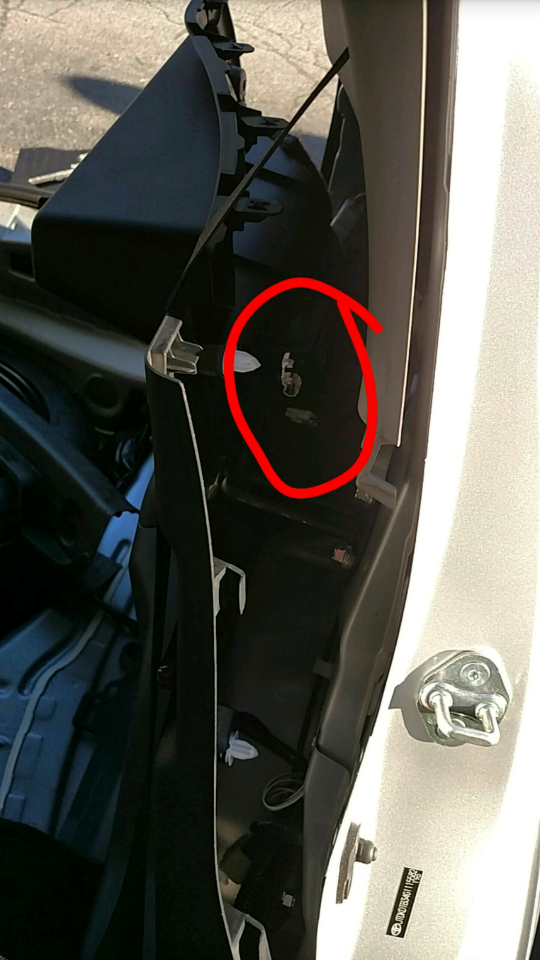
Step 7: Disconnect the light from the right plastic liner. It's a simple tab you push and pull the connector from its housing. There is only one light, the otherside will not have one.
Step 8: Remove the plastic hatch liner from both sides. These also just pop out, so give it a good tug. Each side should have 2 distinct pieces that separate horizontally. You only need to remove the bottom portion. The top can stay in. In the pictures from the last step, it's the black plastic on the bottom that was screwed in not the tan top part that has a hole for the seat belt. It took me a little bit to finally get everything out due to it's tight fit. Pay close attention to how it is connected and how you took it out because I found it difficult to get it back in, but with some patience, it'll go.
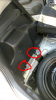
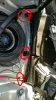
Step 9: Remove the 3 bolts. These are in pretty tight so get some leverage working for you. Once these last 3 bolts are removed the back seat can be taken out.
Step 10: Reverse the process and reassemble the back seat of your car. Once all the panels/trim/liners are in place, they can be snapped back into place easily. To reinsert the 7 center punch pop tabs for the kickplate, push the pointy end toward the "head" (if it were a nail). Instead of being depressed in the center, it will now be flush. Push it again toward the head and the center will extend outward. Put the pointy end into the hole and depress the center until it is flush again to secure the pieces together.
Here's how to completely remove the back seat of a 2014-2016 Prius C. The front seats are pretty simple, 4 bolts total on each end of the track. Pop off the plastic covers on 3 of the ends to reveal the bolts.
PART 1: Bottom seat removal
Step 1: Remove the bottom trim. This will allow you to remove the plastic "kickplate" in step 2 and the plastic hatch liner in step 8. Get your finger tips underneath it and pull up, it'll snap out easily.

Step 2: Remove the plastic "kickplate" at the base of the back seat seat that protects the batteries by pushing the center of approximately 7 pop tabs and pulling them out. Once the plastic is removed, you will see everything under the seat. (I don't remember how many there are exactly but they are all at the top.) I don't have a picture for this, but it's the piece that your heels would hit if you were sitting in the seat.
Step 3: Remove the bottom seat. Firmly grab the side of the bottom seat and pull upwards. There are 2 snap connections that hold the seat in place in the center of each "seat" where 2 people would sit. It doesn't take a ton of pressure to release the seat from the battery cage. You won't break them, go ahead and really pull.


PART 2: Folding back seat / back rest removal. Fair warning, this part is not fun. The seats that fold down are attached by 3 bolts to the chassis of the car. You will need to remove the entire bar that allows the seats to fold down.
Step 4: Take out everything in the hatch except the spare tire. That would be the floor mat and the 2 foam inserts. Once you do this, one of the 3 bolts connecting the bar to the chassis will be exposed in the middle. The other 2 are located on either side under the plastic liner.
Step 5: Open the hatch and remove the center plastic trim the covers the latch to the hatch. It is held in by 2 plastic tabs that just pull out. They're in there pretty good, so I used 2 flathead screwdrivers as leverage to get them out.

Step 6: Remove the 2 silver screws holding the plastic liner in to the chassis on the bottom and 1 black screw about halfway up nearest the weather stripping. Do this to both sides.

Step 7: Disconnect the light from the right plastic liner. It's a simple tab you push and pull the connector from its housing. There is only one light, the otherside will not have one.
Step 8: Remove the plastic hatch liner from both sides. These also just pop out, so give it a good tug. Each side should have 2 distinct pieces that separate horizontally. You only need to remove the bottom portion. The top can stay in. In the pictures from the last step, it's the black plastic on the bottom that was screwed in not the tan top part that has a hole for the seat belt. It took me a little bit to finally get everything out due to it's tight fit. Pay close attention to how it is connected and how you took it out because I found it difficult to get it back in, but with some patience, it'll go.
Step 9: Remove the 3 bolts. These are in pretty tight so get some leverage working for you. Once these last 3 bolts are removed the back seat can be taken out.

Step 10: Reverse the process and reassemble the back seat of your car. Once all the panels/trim/liners are in place, they can be snapped back into place easily. To reinsert the 7 center punch pop tabs for the kickplate, push the pointy end toward the "head" (if it were a nail). Instead of being depressed in the center, it will now be flush. Push it again toward the head and the center will extend outward. Put the pointy end into the hole and depress the center until it is flush again to secure the pieces together.
alistaircookie likes this.
Attached Files:
XenCarta
© Jason Axelrod from 8WAYRUN.Com